Tuesday, July 21, 2020

Organizing with Simply Serene Space


Believe it or not I have an online job I do and this is my workstation. Can it be any more cluttered? I would bring things over to work on and then just leave them there to muddle through later. I'd lose things and go bananas trying to find them. Ugh it was awful


Now I can't promise that I don't have books or papers on the desk all the time. But I do make sure that it doesn't get cluttered. I actually don't want it to go back to the way it looked before I couldn't work like that again.


The book shelf was filled and overflowing and now that I arranged and went through everything I now know where all my books and resources are.  I would pile things on top of my bookshelves for storage. To be honest I would forget what was in the containers and have to open every single one to see what was stored in them. As cluttered as it looks I was totally cluttered in my creativity. 


At the very least I am able to find my journals and watercolor sheets that before stacked all over the room. Oddly enough you would think I would remember where I put things but I would lay it here or there and never remember I had them. Now I know this is their spot so that's where they will be.


Here's a view of one of the shelves system I had put up. Notice that the very top is not being used I have to get a step-ladder to get up there so it doesn't make it easy for me to get to so I just decided to forgo the shelving system.


Here is that book shelf now. All my papers and stamp sets are lined up in an order to help me not only use them but when I place an order I'm not buying things I already have tons of in my shelf. This not only saves me time it saves me money! I like that cause then I can buy things I really do need. 


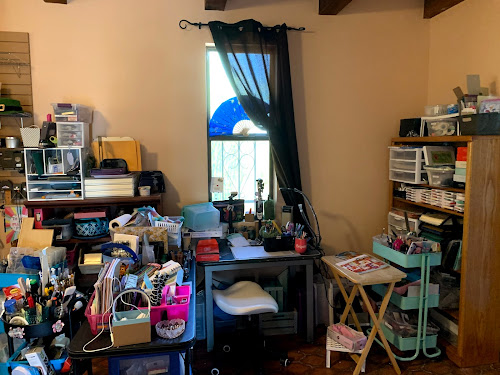
This is where I film my YouTube uploads. Just total craziness right? Notice the book shelf to the far right total kaos. Inks, paper, and etc. I thought I had my paper organized easily but actually check out the next picture and see how much better and more accessible everything is now. 


Well, with the help of Gina my organizer we were able to purge and organize. 


Now on close up the table is a mass with items but this is the new set up for my filming and it is so much better. I can have my items at the ready for filming and not have to pause the video to go scrounging around for my supplies. What a joy it is now to do craft video's.


Saturday, July 18, 2020

7 Halloween Cards with Stampin’Up! Products


Card number 1
The first card is done on some orange card stock  in a standard 4-1/4 X 5.5 format folded landscape style. I used a stamp to ink the sentiment on the DSP in black and held in the right position you get an erie shadow effect. This is a very simple card on the inside I only used a stamp set inside. The best part I think is the side stamp that says Spooky, it is on the vertical and this stamp set has corner stamps which are really neat.

Card 2 
Brown card stock and I use the DSP on the inside of the card cut down about 1/4 inch on all sides so roughly 4-1/8 X 5-1/4 approximately. The outside is the really interesting part. Taking some 2 inches by 3-1/2 and 1.5 inch DSP with a die cut edging and about a 3inch by 2 inch DSP for the sentiment layered with a Celebrations label Die outline I put the sentiment inside. All my cuts are approximate I really don't measure I use what I have and then see if I like how it sits if not then I cut it til I'm happy. Using the glitter paper and the Halloween Magic dies decorated the card with some glittery bats. 

Card 3
A standard card score 1/4 inch off center and fold it will create an edge that shows off your interior DSP. I had to cut the edge a little to be able to put it into a standard envelope but I still ended up with a cute card. I cut my DSP about 1/4 inch shorter all the way around to get a black border which highlighted the paper nicely. Again glitter paper makes the front of this card stand out on its own. The 3 strips of paper came from a black and white DSP and I used the celebrations stamps for the owls and the sentiment. You could color these but I liked the black and white feel instead.

Card 4 
Happy Haunting card with bats of course. You don't have to cover your entire card with paper. Using a small amount of DSP on the front saves the rest for others. Although the bottom layer is pretty big only to off set the smaller version of the back side of this paper. Using some plain card stock for the sentiment and the inside of the card.

Card 5
You don't have to have the entire inside covered either. Having about 4" x4-1/2" of DSP I used a sentiment on the inside to focus away from the bottom of the card which I think makes it interesting.
The front of the card uses a larger version about 4 x 5-1/4 giving the card a nice black border do what works for you. Then a focal point with about a 3x2" DSP. Die cut a banner and using the new Banners punch for the sentiment. Oh we can't forget the glitter bats now can we?

Card 6 
Here is a card that looks like it's difficult but it is really easy. Cut, score and fold a card as you normally would for a landscape card. Open it and cut about 1" in from both sides stopping at the middle fold. I glue these down but you can cut that away. Then I glued a 4-1/4 X 5-1/2 DSP  inside of the card. I also stamped on the inside top of the card to decorate it but it was blurry and I felt if I put a focal point on it might help to take the focus away from the blurry. It actually doesn't look too bad. On the front I used the corner stamps on the paper and I really like how you can appreciate the papers beauty. Here comes more glitter paper using the die cut I cut out a banner that jazzes it up a little. 

Card 7 
The best is last, this card was embossed with spider web and I scored and folded 2.3/4" from either edge on the long sides. So that you can have a center opening. The front DSP cut 2- 5-1/4 X 1-3/8. Inside is 5-1/4 X 4 Adding a sentiment.  On the outside I used glitter paper cut die cut from label dies and then attached only half of it and it holds the card closed pretty well. The sentiment was punched from the banner punch. 

Hope you enjoyed the cards.

The following are the new items and numbers of the products I use in the video. All of them are from Stampin’ Up! Know that Stampin' Up! Does not endorse me or provide items for me to use. I buy everything myself and the ideas are mine or have been influenced by artists or card makers I watch on YouTube. 

The card stock is from Stampin’ Up! as well. I like the thickness of their card stock as it folds nicely when making cards. When I’ve used other card stock I noticed that I would get cracks in the folds. 

Banners Pick a Punch- 153608
Stamp Set Cling Have a Hoot 153389
Ghoulish Goodies Cling Stamp Set 153362
Banner Year Photopolymer Stamp Set 153464
Festive Corners Photopolymer Stamp Set153462
Halloween Magic Dies 153565
Hallows Night Magic Cling Stamp Set 153356
Magic In This Night Designer Series Paper153517
Cobwebs 3D Embossing Folder153578
Black Glitter Paper 153158
Celebration Tidings Photopolymer Stamp Set 153456
Celebration Label Dies 153570

#29faces day 1

                                #29faces           Martha from I love 2 paint on YouTube started 29 faces in 2012  Martha's Channel here...